Search the Community
Showing results for tags 'landscape'.
Found 6 results
-
Old exposed roots of a tree convey age, strength, adaptation and commands our respect. Though they look quite complicated to draw, once simple steps and techniques as shown below are understood, they can be drawn in limitless ways. Follow along the steps below and see how fun it is to draw such old roots. Step 1: Draw Initial OutlineIt is important to get the outline right as there needs to be order in how the old roots are feeding into the trunk for it to look plausible overall. A simplest way is to start by drawing two roots on either side that feed into the trunk as shown below. Step 2: Draw other Main RootsWith the above as the base, other roots can be added as shown below. Notice that in this approach, there is a plausibility and understanding of root structure leading to trunk. Make roots slightly tapered as shown below. Step 3: Add Secondary RootsWith the outline established in step 2, other secondary roots can be drawn as show below to make it more visually interesting. Depending on the size of the drawing, other smaller roots can be added as well. Distribute them well but don't lay them out in a pattern. Give it an irregular feel. Use your instincts and have fun in this creative process. Step 4: Texturing RootsTo texture roots, use tapered crevices and marks as shown below. Darken one side more to bring out the form or roundness of the roots. Here is a close up of a textured root. Note how the edges are irregularly darkened and one side uses dark tapered irregular shapes to texture roots. Here is the outline textured using the technique described above. It is important to use irregular tapered shapes and to avoid any pattern. Click on the image below to see it in detail. Step 5: Adding Dark BackgroundTo give perception of depth, darken the areas that are NOT roots. This provides the background against which the drawn roots stand out. Notice that I have used tapered shapes for the background. Don't use rectangular shapes as they are not visually pleasant. Step 6: FinishTo finish this drawing, I added grass and other ground cover and used parallel lines to provide a kind of backdrop to it. Other elements like trees, wooden posts etc. can be used as well to create very pleasing drawings. Drawing of an old root is quite visually pleasing by itself. By using different shapes and layout for the roots, different pleasing such drawings can be easily done from imagination. Following is another example. This completes this tutorial. With the steps explained above, a complicated looking drawing like the one above can be easily broken down into easy, simple steps that anybody can attempt and be successful at drawing an old root. Give it a try. Click here to download template to practice the steps. If you want to learn drawing pleasing pen and ink landscapes, then check out my FREE tutorials and pen and ink drawing workbooks. They are a great way to learn this wonderful art and adopt this creative hobby. Pl. share this in your social media and with others of creative instinct to help then learn about it as well. Feel free to reach out to me for any help and guidance. Happy Drawing, Rahul Older Step by Step Pen and Ink Drawings FREE Pen and Ink Drawing Tutorials Subscribe
-
Last week we learnt how to draw a waterfall and this week we will stay with water and learn how to quickly draw a river/stream. It is again quite easy to do once few simple techniques are understood. So grab a pen and paper and follow along and enjoy discovering your creative side. Step 1: Drawing River/Stream OutlineDraw a tapered shape of outline as shown below as it is visually interesting. Step 2: Drawing River Bank.Depending on the location of viewer, usually, one bank of river is visible. Draw it by using vertical parallel lines to define the depth of the river bank. Step 3: Drawing WaterWater can be indicated using few simple overlapping lines as shown below. Make the lines follow the contour of river's bank. Step 4; Drawing FoliageIt is visually interesting to have something by river's edge that is reflected in water. A simple foliage works very well. It can be drawn using a combination of scribble for foliage and tapered darks for trunks. Vol 5. of my pen and ink workbook discusses drawing foliage in details. Step 5: Drawing ReflectionProper reflection in water is very important to bring out the feel of water. It can be drawn using horizontal lines as shown below. Draw reflection of foliage in water using the above technique. Step 6: Finishing with Other ElementsTo bring a finished feel, other elements like ground cover, distant tree line, stones, sky etc. can be added. This finishes this tutorial. Hopefully it inspired you to try these simple pen and ink drawings and find how relaxing, enjoyable and easy these are to do. My tutorials provide more information on drawing other elements of nature used above. Drawing is always more fun as a social activity. To share this with others and on your social media, pl. click here. Happy Drawing, Rahul www.pendrawings.me/getstarted
-
Bark texture is ideally suited for drawing with pen and ink and one of really fun drawings in this regards is drawing an old tree stump with deep crevices and grooved bark. Here I will show how with simple stroke and technique you can draw one. There are limitless variations on this and one can be drawn from imagination anytime. Step 1: Draw the Outline. Notice the irregular edges used to draw the outline. Step 2: Draw Main CrevicesMain aspect of an old stump are deep grooves and crevices in it's body with age. Draw them as shown below with bigger towards the centre and smaller towards the edge. Use the irregular outline and taper them. Also add them irregularly to avoid any pattern. Step 3: Darken CrevicesDarken the crevices using parallel lines or you can even use a brush. Step 4: Add Bark StrokeAdd bark stroke to bring out the feel of bark on the stump. Bark stroke is discussed in detail in drawing tree trunk tutorial. Step 5: Add Small Tapered Crevices and Edge IrregularitiesAdd small tapered crevices by darkening the bark lines as shown below. Make it irregular. This starts to bring out the feel of rough bark texture on the stump. Step 6: Darken One Side MoreDarken one side more to bring out the feel of roundness for the stump. Light doesn't fall uniformly on a curved surface and such tonal differences are needed to bring out the form of a curved object. This is discussed in detail in vol 1-2 of my pen and ink drawing workbooks. Rough bark texture with deep grooves and rounded feel of stump is now established. Step 7: Texture RootsUse curved parallel lines as shown below to give a curved form to the roots. Step 8: FinishFinish by adding small tapered crevices and darkening one side of roots to bring out their form as well. This completes this drawing. As you can see above the technique and stroke used are very simple and and by using different shape of outline and size and placement of crevices different variations on this can be easily drawn from your imagination. Following is another example. In yet another variation, holes in the stump can be indicated to indicate further decay. Following are 2 additional examples. In the following examples, grass is added to ground the stump as well. This completes this post. Hopefully you found it useful and motivated you to try doing such pen and ink drawings. If so, you can further check out my FREE pen and ink drawing tutorials and pen and ink drawing workbooks to learn to draw pen and ink landscapes in step by step illustrated manner. Happy Drawing, Rahul Subscribe Older Step by Step Drawing Posts
-
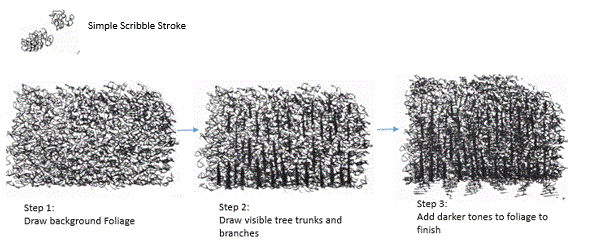
Here is a very simple way to draw a wooded area using simple scribble stroke. Watch the video demonstration and follow along. This simple fun drawing can be done anywhere and is always enjoyable. If you like the experience and want to adopt drawing simple landscapes with pen and ink as a creative and relaxing hobby, then check out completely free tutorials I have created for this purpose. Have fun, Rahul www.pendrawings.me

-

Learn To Draw Simple Landscapes In Pen And Ink
rahul_jain posted a topic in Fountain & Dip Pens - First Stop
Here is a quick sketch I did in pen of winter landscape in my neck of woods....Learn to draw such simple landscapes with completely Free, fully illustrated step by step tutorials at my website www.pendrawings.me/getstarted. Also subscribe to receive Free daily templates to practice doing simple landscapes with full instructions. My goal is to promote pen and ink drawing as a simple, fun, relaxing and creative hobby. Join me.
-
Learn To Draw Landscapes In Pen And Ink
rahul_jain posted a topic in Fountain & Dip Pens - First Stop
Try this simple landscape and follow along with the video...You can see lot more demonstrations of how to do simple landscapes on my YouTube channel. Also I have completely Free, fully illustrated tutorials to help you get started drawing in pen and ink and adopt this relaxing and creative hobby. Have a creative weekend, Rahul www.pendrawings.me