Search the Community
Showing results for tags 'homemade'.
Found 10 results
-
Right so I was looking through my drawer one day and found a bottle of Sheaffer Red, Black, Royal Blue and Brown. I thought I should attempt at making something like Diamine Oxblood from these inks. It turned out AMAZING. The ink shades beautifully and the colour is way too good. Hope you'll enjoy Right. So the ink is very smooth and it writes beautifully. It's got a good dry time and shades well as well, you can zoom in on the uploaded photo if you like. So overall, these are the scores I'd give it: Smoothness: 4/5 Wetness: 4/5 Shading: 5/5 Drying time: 3/5 That gives us 18/20, which is quite respectable IMO. Attaching the file so you can download it if you want to.

-
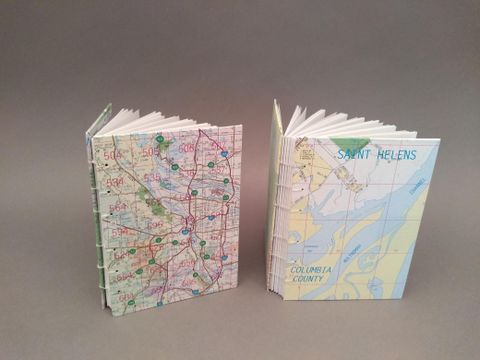
Old Map + Daiso Paper = Homemade Journal Rabbit Hole
ceramicmj posted a topic in Paper and Pen Paraphernalia
Before Thanksgiving, I googled Daiso paper and Fountain Pen reviews - there are no Daisos in Portland, and I was going to the land of the many Daisos (4 within easy driving distance of relatives). This led me to an unexpected hobby, thanks to TMLee's very detailed review and a lurking bombshell of a link that led me to his "355 Mini" journals. https://www.fountainpennetwork.com/forum/topic/314318-the-355-mini An hour later, I emerged from the rabbit hole, hooked! I hauled as many notebooks home as I could (note: there were witnesses, some restraint was displayed). Combined with an old Thomas Guide (detailed map of Portland) and various found items in the house - off I went! Youtube was my friend for single coptic stitch demos. There were (and still are) lots of mistakes, but you learn by doing, and these are perfect for rapid prototyping! There's uneven tension, missed stitches, but I ADORE them! (you can probably guess which one was book #1) I'm now adding flyleaves (limited success - need better paper and to not yank thread in directions that tear the fragile paper). I want to experiment with a pocket, elastic... those are coming soon. I have pockets cut out, elastic purchased. More pix later, but I want to get this posted before I accidentally zap this again (first official thread! first photos! Note to self, find out where things are autosaved). (fingers crossed, gonna hit post now)
-
Hello all! I wanted to make my own nib for some time, and I don't have the proper tools. So I invented a new type of nib! And also the feed! I tried several designs, but I found that this one works well. I cut a sewing needle in three parts without the tip. Put them together in a triangular shape. Put all three of them into a screw dowel right for the size of my section. And put all of them into the section. To keep the "tines" properly pressed to each other, I used a part of another dowel. Then sanded the "nib" to a proper shape. This one writes a little italic. And, you can grind all three sides of the nib to different sizes! You can have a pen with F, M, and B nibs for example. It's my gift to all diy fans.
-
The following recipe is a recipe for Lilac Colored fountain pen ink manufactured using water-based dyes. I have not tested this recipe yet, but I have ordered all the materials and plan on testing it as soon as they arrive. I will then update the recipe with the results. The recipe was created by me, using my knowledge about fountain pens, other FPN users' experiences, and my knowledge about chemistry from my AP Chemistry Course. I chose to make Lilac ink to match my Dark Lilac Lamy Safari that will be arriving shortly. Materials: Procion MX Lilac Cold Water Fabric Dye- The main source of color for the ink and the major dye in the ink. Pure Glycerin- To increase the viscosity of the ink and make it better able to flow like normal pen ink. Germall Preservative- To prevent the formation of SITB and increase the shelf life of the ink. Polysorbate Tween 80 Surfactant- To make the ink flow more easily. Distilled or De-Ionized Water- The main solvent of the ink. Funnel- For easier pouring. Filter Paper- To remove accidental sediments that could clog pens. Cheap Sacrificial Test Pen (I'll be using a Jetpens Chibi)- To run initial tests of the ink. Lots of Paper- To write on with the above pen. Empty 30 mL Ink Bottle(s)- To store your new ink. Blunt Tip Syringe- For the measurement and addition of glycerin. Gloves- In case you have a dinner party later and can't have inky fingers. 50 mL Graduated Cylinder- To measure the water. Centigram Scale- To measure the dyes and glycerin. Safety Goggles- Standard Lab Procedure. Lab Apron- Same as above. 50 mL Beaker- For the initial mixing of the ink. Ring Stand- For the final filtration. Glass Stirring Rods- To mix the parts of the ink. Graduated Pipettes- For the measurement and insertion of the surfactant and biocide. Procedure: 1. Measure out 30 mL of distilled water in a graduated cylinder. Add the water to the 50 mL Beaker using a funnel. 2. Use the Centigram Scale to measure out 2.00g of Procion Dye. Add the dye to the Beaker. Stir until the dye has dissolved in the water using a glass stirring rod. 3. Zero the Centigram scale with the blunt tip syringe on it. Then, use the syringe to pick up 1g of glycerin. Add the glycerin to the beaker, and stir until dissolved using a glass stirring rod. 4.Using Graduated Pipettes, add one drop of Polysorbate Surfactant and one drop of Germall Preservative to the beaker. Use a glass stirring rod to stir until dissolved. 5. Using the beaker, filter paper, and ring stand, filter the contents of the beaker into the Empty Ink Bottle. Ideally and theoretically, there will be no remaining sediment on the filter paper, but this step adds an extra level of security to protect our pens. 6. Ink up a pen and try out the ink, adjusting levels of Surfactant and Dye to match your ideal properties of flow and color saturation. Be gradual, as you can always add more, but if you add too much surfactant the batch is essentially ruined. This recipe is still untested, so I wouldn't go trying it in your pens just yet, but I intend to have the ink made by at the latest June 8th, and will post the results then.
-
Inspired by Do-It-Yourself pen boxes (like this one by StephanV), having a STRONG aversion to the smell of tobacco rendering a re-purposed cigar box unviable, and with a desire/need to keep costs down, I decided to make my own pen box. With the input and help of a good friend with a woodshop, this is what I came up with: I'll post some process photos and a description of how I made it in the event that it may help a future fountain pen enthusiast who wants to give it a go himself.
-
Greetings and Salutations! Well, after a lonnnngg break from ink mixing and fountain pen faffing I've finally returned and had some fun. I decided that I wanted to make my own ink. Not mix, but MAKE. First off, I have to give all the credit to Pharmacist since this ink is based on his recipe. I did deviate on some of the steps but I will explain that below. The biggest hurdle was to get hold of Gallic Acid. I searched high and low and could not find ANY in South Africa, but finally managed to get some imported by a chemical company. The rest of the chemicals are quite easily obtained here. So without dragging this out, here's the recipe: 5ml glycerine (I did not add this, as I will explain after) 1gm Gallic Acid 1.5 gm ferrous sulphate (hydrated?) (FE2SO4.7H2O) 200 mg salicyclic acid (preservative to prevent mould) 1ml hydrochloric acid 25% distilled water Steps 1. Dissolve gallic & salicylic acid in 40ml hot distilled water 2. Dissolve ferrous sulphate in 40ml hot distilled water 3. Add hydrochloric acid to (2) 4. Add (3) to (1) 5. Add 10ml Pelikan 4001 Royal Blue to (4) - did not add 6. Add glycerine to (5) - did not add Okay, the recipe is easy and straight forward. I did not perform step 5 & 6, so I ended up with a base iron mix that is pale lavender in colour. On paper it is basically invisible for the first 10 seconds after which it starts turning black. The reason I did not do the last two steps is to be able to experiment with different colours etc. I took 3ml of the base, added .5ml glycerine and .5ml Waterman Purple. The result is a light purple ink that darkens to something I would swear is the exact same ink as R&K Scabiosa. I've tried the ink in a cheap eye dropper with a bit of a scratchy nib (yeah yeah, Im too lazy to smooth it), but the ink flows nicely. Shading is very good and since it Is and IG, it is waterproof in the sense that only the added dye/ink will wash away, leaving the black IG component on the paper. The test was done on Tamoe River (cream). I do not have proper tools to measure the acidity of the base or final ink but after a week in the cheapy pen (no precipitation or gunking) I can't see any adverse effects yet. I'm linking the smaller version of the scan and including a link to the full sized version. http://i1102.photobucket.com/albums/g459/NeelsK/Ink%20Mixes/Pseudo-Scabiosa-small_zps53115ce6.gif Link to full size scan: http://i1102.photobucket.com/albums/g459/NeelsK/Ink%20Mixes/Pseudo-Scabiosa-full_zps1a751451.gif~original
-
I found a beautiful Estie in light green at an antique flea market. I just loved the color, and since the price was right (tagged as $30.-, but haggled down to $20.-,) money changed hands and it came home with me. Luckily, I was able to take the section out without too much difficulty. Doubly lucky, as I already had an extra ink sac at hand. I bought four at Philly Pen Show, to repair two Esties I had at hand... from last year's flea market season. Figured I would get a couple of extras in case I mess up. Turned out I was able to replace both without any problem, thanks to Brian Anderson, who kindly showed me how to do it, and the great thread here. Which meant I still had two sacs left! My luck, however, ended there. After removing the fossilized old sac that broken into pieces, the J-bar fell out as well. It was completely rusted and corroded. Sigh.... I was luckier with the two earlier ones, both of them had intact J-bars. I tried to transplant a J-bar from an Estie desk pen that I also picked up at the flea market for $1.50, but it was a tad too long, by like 1/8 of an inch... didn't clear the nipple. I started looking around here, and saw that someone successfully made a J-bar from a hair clip! Since I also had an old hair clip lying around, I figured I could give it a try. I was just too eager to get my new pen working to order the new J-bar/ wait for it to arrive in the mail... And- wow, amazingly enough, it worked!!! It is writing beautifully now. Thank you everyone, for posting the great tips and sharing the great wisdom!!! The nib was like this... Tried cleaning it... (Got cleaner than this, after all.) J-bar from the desk pen, corroded J-bar, and the new one in making. After this, I peeled off the black plastic thing and bent it to shape. The old one came in handy to measure the correct length! Family shot! Since this one is slightly shorter and slimmer, is it an SJ??
-
Anyone know of good homemade ink recipes that are fun colors? Everyone has tried making some form of black, but I never really see homemade colors.
-
I made this over spring break, like 8 months ago, and then it just sat on my desk for a LONG time. But now that I'm actually using it, I wanted to show it off XD. This was my second pen wrap that I made, after the first one didn't turn out too great (and my mom burnt part of the suedecloth with the iron). I changed the interfacing to a thicker one, although it was somewhat problematic to sew it because it became a bit too thick. Next time, I'll choose an interfacing somewhere in the middle Cotton outside, Suedecloth on the inside http://fc07.deviantart.net/fs70/i/2013/365/f/0/marvel_pen_wrap_by_vampduzell-d6kxllf.png
-
Here's a link to a tutorial at Ragehaus.com that gives directions on how to make one's own wax seal out of wood: http://ragehaus.com/?p=1215. I'm not sure why I didn't think of this years ago; whenever an idea prompts this reaction, it's a sure sign that the idea is probably genius, or at least worth trying. Even if working a reverse impression in wood wouldn't allow the same sort of precision and detail that brass or other metals permit, wood is at least treats the pocketbook gently. I think that I'm going to mount a search through my pile of scraps in the hope of uncovering a suitable length of 1" dowel. All the best, Italicist