Jump to content

Sheaffer vacuum filler repair


fountainbel

Recommended Posts

Hello to all of you !


I bought are several Sheaffer vacuum "plunger" fillers on which the rod sealing cartridges are leaking. They are from the later version, with the piston not directly in the barrel but with a separate ink container.

This was the occasion for me to design ( & shortly make) a new sort of rod cartridge equipped with an interchangeable sealing element. I provided a neoprene O ring on which the sealing tension can be adjusted. When the O ring wears in time, one can tighten it up further obtaining again an optimum sealing effect. When is gets completely worn (over a long time!) one simply has te replace only the O ring. The ( black delrin) cartridge is mounted with a snug-fit collar 2 mm deep in the ink container, so one looses only minimal ink volume. Note I designed cartridges for both types of vacuum fillers: one with the cartridge directly in the barrel, the other cartridge for mounting in the internal ink container. I will have both prototypes available within a few weeks, so I will surely keep the forum informed on the test results. I also remarked some of the rods are "pitted". Does anyone of you know an adress where I can buy vacuum fillers rods of different lengths? Making new rods is surely possible but unfortunately the thread making tools are not available in Europe. Any idea what type of thread is on the rods & where I can buy the thread cutting tool?

Another problem I want to share concerns the disassembly of the barrel & the section. I never had problems to do this on the vacuum fillers version with a separate internal ink container. However on the version were the piston fits directly in the barrel I always have disassembling problems & broken pens. Are the barrel & section originally glued together or are the joined with (left or right) threads ? I would be gratefull if you could help me out on this one !

Thanks in advance for your help & for shearing your thoughts on my approach !


Kind regards, Francis

Link to comment
Share on other sites

  • Replies 32
  • Created
  • Last Reply

Top Posters In This Topic

  • fountainbel

    13

  • Maja

    5

  • Johnny Appleseed

    3

  • revdem

    3

Francis,


I am far from an expert on these, but I have been doing some vacuum-filler repair myself, so I can offer some thoughts.


One, for dis-assembling the barrell from the section - I believe these were shallaced into place, and the shallac can be softened by heating. A variable temperature heat-gun is the best way to control the heat, but a hair-dryer or other source of dry heat is a usable substitute (I have been using a hot-air popcorn popper, but just got a hair-dryer to try). It's really quite amazing how well it works - warm the section-barrell joint for a few minutes and it unscrews fairly easily. I believe they are all right-threads.


Triumph vacuum-filler are the most challenging in that regard - the section thread-sealer melts at around 65 degrees C, and the plastic can start to deform at 70-75 degrees C (I believe - working from memory here), so heat control is essential. Non-triumphs can be worked at lower temperatures.


As for shafts, I don't believe there is any source in the us, other than parts pens, and the shafts can come in several (6-8?) different lengths, so even finding parts pens can be difficult. Would be great if someone decided to start making them.


I am really interested in your method of repair, especially for the style with the internal ink-chamber. Are you familier with the other methods of repairing these - the "rubber plug" method of the late F. Terry Koch, or the technique for drilling out and re-packing the packing unit?


I have been using what I call the "David Nishimura" method of drilling out the packing unit and replacing it with a specially sized rubber gasket (looks like a really thick o-ring) that he sells on his site. See:

Basic Plunger Filler Repair


Please do share.


Johnny Appleseed

So if you have a lot of ink,

You should get a Yink, I think.


- Dr Suess


Always looking for pens by Baird-North, Charles Ingersoll, and nibs marked "CHI"

Link to comment
Share on other sites

As for shafts, I don't believe there is any source in the us, other than parts pens, and the shafts can come in several (6-8?) different lengths, so even finding parts pens can be difficult. Would be great if someone decided to start making them.


I am really interested in your method of repair, especially for the style with the internal ink-chamber. Are you familier with the other methods of repairing these - the "rubber plug" method of the late F. Terry Koch, or the technique for drilling out and re-packing the packing unit?


Johnny Appleseed

Hi.


Victor Chen is handling the late Fr. Terry Koch's inventory. He does have (or used to) a number of the threaded rods used in the pens, and as you note Johnny, there are a number of different lengths. You have to dissassemble the pen to be repaired and measure the rod length before ordering.


It's a good idea to order the catalog from Victor, as it describes all of Fr. Terry's parts and tools, and includes a few repair tips.


Victor can be contacted at: vwchen@pacbell.net


Yes, please do keep us informed of your tips and techniques Francis, there's a great deal of interest on this board I believe.


Gerry

Link to comment
Share on other sites

Thanks Gerry. I figured you would have some good input.


Victor Chen is handling the late Fr. Terry Koch's inventory. He does have (or used to) a number of the threaded rods used in the pens, and as you note Johnny, there are a number of different lengths.


I didn't realize Victor had threaded rods. I will have to email him and see if he still carries them. Got a "350" waiting for one right now.


It's a good idea to order the catalog from Victor, as it describes all of Fr. Terry's parts and tools, and includes a few repair tips.


Victor also has Father Terry's Sheaffer repair manual, which also has lots of hints and tips. It's more of a collection of notes than a real repair manual, but it has some excellent information.


Also - I assume you have "Da Book" - the GUIDE TO FOUNTAIN PEN REPAIRS by Frank Dubiel. If not, that is a vital resource for these and many other fountain pens. It is available from Pendomonium, and Fountain Pen Hospital, among others.


JA

So if you have a lot of ink,

You should get a Yink, I think.


- Dr Suess


Always looking for pens by Baird-North, Charles Ingersoll, and nibs marked "CHI"

Link to comment
Share on other sites

Thanks for your valued input Johnny & Gerry !

I will surely contact Victor Chen for the plunger rods.

Note that I am aware of the actual used alternatives to repair worn rod seals, but I miss the "maintenance friendliness" in them.

Maintenance friendliness i.e. "easy exchange" was my primary goal when designing the new sealing cartridge.

Indeed , replacing a worn sealing element should be a simple & straight forward operation, not limited to specialists.

The design aims to replace a worn sealing element - being only the O ring in this case -within 5 minutes. No need to glue, no specials skills nor tooling needed.

The O ring is mounted in a chamber in the cartridge housing, axially fixed & pre-tensioned by means of a screw plug.

Both the cartridge housing & the screw plug are made from black Delrin. This material provides an excellent & wear resisting guiding support for the rod.

Note I made a dedicated design for both versions of vacuum plunger fillers.

On the earlier vacuum plunger fillers thecartridge is "snug-fit" mounted in the existing barrel chamber bore. The screwplug has a triple function on these fillers: fixing & pre-tensioning the Oring, guiding the rod & providing fixation for the blind cap (on the rod) after the filling operation. (Screw threads in cartridge & blind cap are identical )

On the second version, having the internal ink container, the cartridge is snug-fitted in the ink container. Here the screwplug has only 2 functions : pretensioning the O ring & providing guidance for the rod. Here the screwplug simply sits flush with the cartrigge after pretensioning the Oring.

I will surely keep you informed on my test results !


The plunger-rod "pitting" problem still bothers me.

I would appriciate if anyone of you folks can help me in determing the size of the screwthreads on the plunger rods & possible giving me an E-mail adress or a site on which I can buy the screw making tool.


Regards, Francis

Link to comment
Share on other sites

Hi Francis,

I'm a little late in chiming in here, but your idea sounds like an intriguing one. Can you post a photo or two to show us what you did to the vac-filler?

I am trying to picture it, but I am having problems :P


Oh, and I agree that ordering the late Father Terry's vac-filler repair booklet from Victor is a good idea. Father Terry also had a repair parts and tools booklet that I got at the same time from Victor. The two booklets only cost me $2 USD total.

Link to comment
Share on other sites

Hi Maja,


I will be able to show some pictures of both cartridge versions by mid November , when the prototypes will be ready. I'm actually waiting for the tread cutting die allowing me the copy the existing thread of the blind cap on the new screwplug.

Can you tell me how I can put the pictures on the forum ? I'm more mechanically oriented & not so familiar with computer stuff.

I also managed to determin the thread on the plunger rod, so I will be able to make my own rods as well. Thread looks to be size 0 fine UNF, 80 pitch.

Is there someone of you folks who can confirm this ?

Thanks in advance,


Regards, Francis

Link to comment
Share on other sites

Hi Francis, I think you first need to find a website that will host your photos like www.imageshack.us , then you copy the URL assigned to your photo and post it here by clicking on the IMG button in the posting page where you create a new post.


Maybe someone else can chime in with more ideas; I use my own personal site just to host photos and have never used Imageshack, et al.


Looking forward to seeing the photo(s)!

Edited by Maja
Link to comment
Share on other sites

I have a nice Sheaffer vacuum filler that is loosing the vacuum as described in this thread. I intend to follow the directions above about disassembly and put a new seal in it.


I have noticed that the rod seems to be coated with plastic.(Or something like plastic) . And further, the rod is bumpy. Little tiny lumps that are either part of the plastic coating or under the coating. When you rub your finger over the rod you can feel them. Is that normal? If I take it apart and take the rod out can I/should I lightly sand the rod surface to remove these little bumps?

Edited by Mac In Oak Ridge
Link to comment
Share on other sites

Another problem I want to share concerns the disassembly of the barrel & the section. I never had problems to do this on the vacuum fillers version with a separate internal ink container. However on the version were the piston fits directly in the barrel I always have disassembling problems & broken pens. Are the barrel & section originally glued together or are the joined with (left or right) threads ? I would be gratefull if you could help me out on this one !

Hi,


Above was a sentence in my initial topic input.


After recieving & reading late Father Terry's guidelines I learned the section & the barrel can NOT be dis-assembled on the version 1"Triumph" Vac-fill pens (V1 = ink container directly in the barrel)

After removing the nib & feed assembly ( apply heat!) one has to remove the threaded bushing on which the TRIUMPH nib & feed assembly was mounted. This bushing portrudes only a few millimeters out of the section & is very difficult to remove since one has no grip on it & it is also sealed ( apply heat !) in the section/barrel assembly. Father Terry suggests to use a "5/16- 7/16 screw extractor". This is a sort of conical screw with left hand thread. When you screw the screw extractor - counterclockwise - in the bushing, it gets blocked & will break the seal allowing removal of the threaded bushing.

This will allow to remove the plunger & perform futher repair work.


Sorry for the confusion I caused . I hope this correction will prevent damaging your valuable vac-fill pens !


Regards, Francis

Edited by fountainbel
Link to comment
Share on other sites

I have noticed that the rod seems to be coated with plastic.(Or something like plastic) .  And further, the rod is bumpy.  Little tiny lumps that are either part of the plastic coating or under the coating.  When you rub your finger over the rod you can feel them.  Is that normal?  If I take it apart and take the rod out can I/should I lightly sand the rod surface to remove these little bumps?

Hi Mac,

In my opinion your problem is caused by corrosion of the (non stainless !) steel rod underneath the plastic coating.

I doubt if you will be able to correct the bumps since the plastic coating is rather thin.

I would suggest to install a new stainless steel rod which- I learned - you can obtain from Victor Chen . E-mail adrees : vwchen@pacbell.net

It seems there are 6 different lengths to cope with the various Vac-fills Sheaffer made. As I understand one has to specify the NON THREADED length of the rod.

The threaded ends are identical on all 6 types.


Good luck ! Francis

Link to comment
Share on other sites

  • 2 weeks later...

Hi fellow penfreaks!

I finally made & installed the first prototypes of the new plunger rod sealing cartridge.

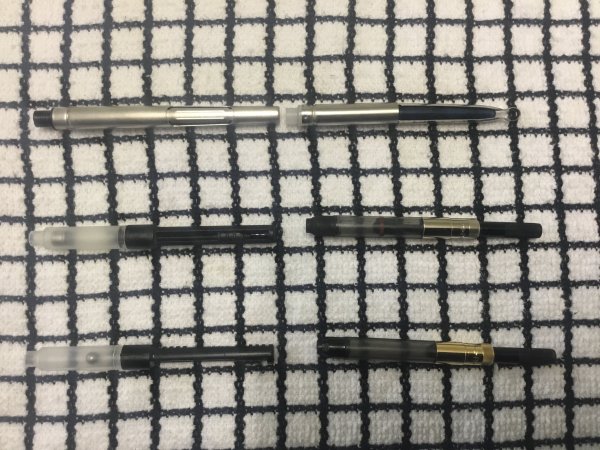
Attached a picture showing the new vac-fill plunger rod "sealing cartridge" for both the V1 (V1 = ink directly in barrel) & V2 ( !nk in separate internal ink container) versions of the Sheaffer Vac-fillers. On the picture you see the assembled cartridge already installed in the barrel & internal ink container, while the separate elements of both cartridge versions are also shown.

I glued (silicone) the cartridge housing in the barrel (V1) and in the internal ink container(V2)

As explained earlier, the cartridge housing remains in place for ever, one only has to unscrew the central screw plug in the cartridge & replace the O ring if there should be leakage after some ( long!) time. Replacement of the O ring can be done by everybody in 5 minutes !

As you can see, both Vac-filler versions - V1 & V2 - have a dimensional dedicated cartridge. However the sealing element - being a standard of the shelf O ring- is indentical.

On top of the picture you see also a dedicated tool , used both to loosen the barrel cap & for pre-tensioning or disassembling the O ring.

I generiously provided silicone grease in the O ring seat, ensuring long maintenance free functionality.

Although visualy identical once installed, real purists will argue this approach is not the identical " real thing" Sheaffer provided, and - purely technically - I fully agree with them.

This approach only aims to provide a modern, TECHNICALLY SOUND, maintenance friendly & simple alternative to repair one of the most beautifull pens Sheaffer ever fabricated.

I tested the 2 prototype pens & the they surely take a lot of water whitout any leakage on the rod or cartridge/barrel seal.

I made one small but important improvement on the V1 cartridge housing , being a 0.2 mm deep/ 2 mm wide concave radial groove which I made in the external diameter. Purpose is to smear the glue in this groove ensuring a good bounding with the barrelseat, coping with( the encountered) small diameter variations between the barrelseats of different pens.

Look forward on your comments & thoughts on this approach !


Best Regards & keep enjoying your pens !


Francis

Edited by fountainbel
Link to comment
Share on other sites

Ah, Francis.

You did it. Now I can go hunting for the 60 year old Sheaffer Red Stripe Valiant Vacuum Fill on my must have list.

Regards,

-Hans.

smilehttp://home.kpn.nl/geele160/pinno.gifand enjoy the moment

Link to comment
Share on other sites

Ah, Francis.

You did it. Now I can go hunting for the 60 year old Sheaffer Red Stripe Valiant Vacuum Fill on my must have list.

Regards,

-Hans.

Hey, I'm looking for a red-striped Triumph vac-filler too, Hans! :D


Francis,

Your design looks very intriguing and is interesting because it allows the pen to be still used as a vac-filler (rather than an eyedropper with the ED conversion that some people choose to do) Thanks for posting info about it here!


~Maja

Link to comment
Share on other sites

Yes, I find the repair parts you've designed to be an elegant solution to the problem of restoring those Sheaffer Vac-fillers Francis. Certainly well engineered.


Any idea what the parts will cost, if you plan to sell them?


Gerry

Link to comment
Share on other sites

Hi,

There has been a lot of intrest from both collectors & vendors questioning if I would sell the cartridges.

Although it was not my initial intention to sell , I am now refecting on how I should proceed.

I can't make the cartridges at a competitive cost on my manual lathe, it took me 9 hours to make the 10 prototypes ! ( 5 of each version)

Consequently I contacted a mechanical shop - equipped with precision automatic lathes- & asked them to give me a quotation for serial fabrication.

Problem is that I will need at least series of 200 or 100 pcs of each version aiming for a cost of $ 15.00/ 20.00 per cartridge. I would therfore appriciate if intressees would express their intrest & tell me how many cartridges of each version they are intrested in. This would allow me to see if I could come to serial fabrication.

Note that I am also in the preliminary negatiation stage with an American vendor who wants to distribute the cartridges worldwide. Patent is pending now, I started the process taking a patent on the design.

I also started in making my own Stainless steel plunger rods,plunger seal backing washers, blind cap a sealing nuts & plunger seals.

Look forward to your reaction.


Best regards, Francis

Edited by fountainbel
Link to comment
Share on other sites

Hi Francis,

Just a question re: the cartridges...Would they have to be permanently installed (by the buyers) with glue (you said "silcone" but I don't know if you meant silicone grease or silicone sealant)...or are they friction-fitted into the barrels?


Thanks in advance!

~Maja

Link to comment
Share on other sites

Hi Francis,

Just a question re: the cartridges...Would they have to be permanently installed (by the buyers) with glue (you said "silcone" but I don't know if you meant silicone grease or silicone sealant)...or are they friction-fitted into the barrels?


Thanks in advance!

~Maja

Hi Maja,


Thanks for your reaction which again triggered new thoughts !


Altough the cartridges fit in the V2 internal ink container with a "snug-fit",I've provided an extra bounding groove in the mating cartridge section allowing a complementary sealing with silicone sealant or shellac.

Note the internal ink barrel has a thin wall & is rather flexible, allowing a rather tight "snug fit "

This extra sealing is only a complementary safety, one could decide to skip it.


On the V1 version I encountered small diameter variations ( up to 0.08 mm) between different cartridge barrel seats. Aiming for a "snug-fit would imply that we would need dedicated cartridges for individual pens.

To cope with the encountered diameter variations while using identical new cartridges I provided a radial groove in the mating part of the new cartridge which should be filled with silicone sealant or shellac.

On the V1 version this extra sealing is needed on the larger amount of pens, while some could come out with a snug fit.

Note that the barrels of the V1 pens have a rather thick wall & are also very brittle ! This limits the allowed pretension of the "snug fit" to avoid cracking of the barrel while pressing the cartridge in.


Alternatively we could decide to ream all barrel seats to a slightly larger diameter, so we always have the same diameter & an identical snug-fit

This is surely feasable however it impleis an extra operation, accidental barrel cracking risks, the need for a special reamer & the need of skilled craftsman.


I tend to leave the barrel as is & apply the sealant . I have done so on a few prototypes with excellent results. Remember one does not have to remove the the cartridges from the barrel or inkcontianer to replace the O rings !

Complementery thoughts & comments are always welcome.


Best regards, Francis

Link to comment
Share on other sites

I'm always thankful for easily-opened packing units when working on pens such as Onotos, Dunns, and the like, and it's a pity Sheaffer wasn't equally accommodating.


Nonetheless, is it really worth the effort to retrofit? The original packing units, using materials of the 1930s and 1940s, often lasted decades (I've been told by older collectors that most of the plunger-fillers found in the 1970s were still in working order); the fluorocarbon rubber gaskets I now use and sell have an estimated lifetime four to ten times that of ordinary nitrile rubber, so it seems a safe bet that it will be a long, long time before the next packing replacement.


Don't get me wrong -- I love elegant engineering and design. But cost and ease of installation have a way of winning out in the real world. Using gaskets and cement-in closure washers costs $1 per pen for parts (and half that if you buy in quantity). Installation requires a 1/4" drill (which can be used by hand, held by pliers), a screwdriver to scrape out the old packing material, and that's pretty much it.

Hi David,

Thanks for giving your valued opinion on the new cartridge design.

However I want to point out an important benefit of the new design, being the fact that its installation is done completely from the barrel side.

So the critical removal of the V1 Triumph section & feed unit is not neccesary.( V1= ink directly in barrel)

As most of us already experienced one does not know what will come loose: the complete nib & feed assembly - if you are lucky ! - or the Triumph nib only.

As the late Frank Dubiel clearly stated in "Da Book" : " If you are really lucky the pen will be one of the 50% or so that don't have the insert present in first place"

One has a problem if the Triumph nib comes off separately: removing the thin wall threaded bushing- portruding only 1.5 mm out of the section ! - is nearly impossible without breaking or damaging it. Removing the bushing using an extractor is possible but distructive. Finding a replacement is problematic.

Quoting "Da book" : "This part was surely designed in hell".

All above mentioned risks inherent in disassembling the Triumph nib & feed are completely eliminated when installing the new cartridge.

It takes me only 20 minutes to rebuild a V1 Vac-filler with a new cartridge, no special skills needed, anyone can do it !

Replacing the O ring seals - if ever neccesary ! - takes only 5 minutes .


Best regards, Francis

Link to comment
Share on other sites

Create an account or sign in to comment

You need to be a member in order to leave a comment

Create an account

Sign up for a new account in our community. It's easy!

Register a new account

Sign in

Already have an account? Sign in here.

Sign In Now


  • Most Contributions

    1. amberleadavis
      amberleadavis
      43844
    2. PAKMAN
      PAKMAN
      33580
    3. Ghost Plane
      Ghost Plane
      28220
    4. inkstainedruth
      inkstainedruth
      26766
    5. jar
      jar
      26105
  • Upcoming Events

  • Blog Comments

    • Shanghai Knife Dude
      I have the Sailor Naginata and some fancy blade nibs coming after 2022 by a number of new workshop from China.  With all my respect, IMHO, they are all (bleep) in doing chinese characters.  Go use a bush, or at least a bush pen. 
    • A Smug Dill
      It is the reason why I'm so keen on the idea of a personal library — of pens, nibs, inks, paper products, etc. — and spent so much money, as well as time and effort, to “build” it for myself (because I can't simply remember everything, especially as I'm getting older fast) and my wife, so that we can “know”; and, instead of just disposing of what displeased us, or even just not good enough to be “given the time of day” against competition from >500 other pens and >500 other inks for our at
    • adamselene
      Agreed.  And I think it’s good to be aware of this early on and think about at the point of buying rather than rationalizing a purchase..
    • A Smug Dill
      Alas, one cannot know “good” without some idea of “bad” against which to contrast; and, as one of my former bosses (back when I was in my twenties) used to say, “on the scale of good to bad…”, it's a spectrum, not a dichotomy. Whereas subjectively acceptable (or tolerable) and unacceptable may well be a dichotomy to someone, and finding whether the threshold or cusp between them lies takes experiencing many degrees of less-than-ideal, especially if the decision is somehow influenced by factors o
    • adamselene
      I got my first real fountain pen on my 60th birthday and many hundreds of pens later I’ve often thought of what I should’ve known in the beginning. I have many pens, the majority of which have some objectionable feature. If they are too delicate, or can’t be posted, or they are too precious to face losing , still they are users, but only in very limited environments..  I have a big disliking for pens that have the cap jump into the air and fly off. I object to Pens that dry out, or leave blobs o
  • Chatbox

    You don't have permission to chat.
    Load More
  • Files


×
×
  • Create New...