|
 |
| The Mad Dutchman,
caught laughing again. |
So, I had this Edson, with a broadish medium nib, and a small burr on the right hand side
of its tip. How it all got this far, is a story I might share some other time.
However, the nib with the burr was a deliberate choice. It was the broadest medium nib
available at the store, as the broad was more than double its width. This medium was just
right for me, and I had been reading on the Internet that it was possible to change the nib
style anyway. Fixing a nib with problems was something the good men and women of PenTrace
were hinting at as well. As I had promised to share my experiences, I decided to take
notes of my adventures. Well, here they are...
I went out and found 1200 grit wet&dry sandpaper. Some people on the Internet had
suggested that 1000 grit was good enough, so I wanted to give it a try. I already owned a
small black Arkansas stone, which seemed smoother than the wet&dry, so why not try that
too, I thought.
And one evening, after checking that the tines were aligned correctly, I just did. Very
carefully, by writing on the wet&dry, in a small puddle of water, I tried to get rid of the
burr.
Moving up and down, left and right, in slow, almost pressureless fashion, and lots of
testing in between by cleaning and dipping the pen, the burr was removed. I tried to use
some very fine car polish paste to try and polish the end result, but it was rather
difficult to apply to a surface as small as the tip of a fountain pen, and I did not dare
using a buffing pad on my Dremel. Anyway, as it was, this only required less than fifteen
minutes of work. Great, I thought.
However, when using the pen in practice, in real world use, it felt a bit rougher than
before. So, out came the Arkansas stone. Holding the pen still, and moving the stone in a
circular motion over the tip in all directions, no pressure applied, seemed to do the
trick.
After using the pen "in the field" as it were, for a couple of days, I was not at all
that satisfied anymore. The pen tended to write drier and more scratchy than ever before.
A kind of grinding experience...
Asking more questions on PenTrace learnt that one should really use very fine grit
mylar (12000 grit or thereabouts) for the final finish. Scouring all the hardware stores
in the neighbourhood of my hometown and my workplace did not result in tracing any mylar
whatsoever, or anything like it.
What I did find was a 30 X loupe normally used for small gemstones and diamonds, and a
Dremel emery polishing disk, however. The latter was not only very cheap, but also finer
than either my Arkansas stone, or the 1200 grit wet&dry, and was flexible as well.
 |
 |
.... making circular movements
in a single plane, and rotating
my hand all the way around the
tip of the nib. |
Good. Gave that a try, holding the pen once more in my left hand, and the disk in the
right one. A lot easier to work with than the Arkansas stone, making circular movements
in a single plane, and rotating my hand all the way around the tip of the nib. Just making
sure not to catch the nib in the hole in the middle.
The result was quite a bit better than before, and basically it became a doublesided
nib as a side effect, medium on the one side, and fine when reversed, a bit akin the
ItaliFine nibs of Richard Binder, I guess (not Italic obviously, but certainly a dual nib).
In the mean time I had also acquired an ST Dupont Orpheo, with fine nib, which was
incredibly smooth. Smoother than the Edson either way around, or than it ever had been.
Listen, it was writing very well indeed now, better than any other pens in my possession,
like my Pelikan M800 for example (yes advancing my pen collection rather rapidly), but, after
all, I happen to be a perfectionist.
Getting frustrated and all, and not having too much time to spare, I decided to do a
search on the Internet, and finally found what I was looking for. 3M 12000 grit on a
plastic film, called International Lapping Film (that would be the mylar, I assumed), and
Micromesh, up to grit 12000, in Micromesh terms, which in fact turned out to be
approximately 6000 grit.
 |
| Assortment of tools used, and pens treated. |
Both could be had from the same shop, in Belgium, but not very far away from where I
live, only 25 kilometers (15 miles) down the motorway. My hometown is in the Netherlands,
but only just.
So, one morning after a phone call to see whether this shop sold to private persons
as well, as it seemed to be a industrial supplier rather than a retail shop, I found out
they actually did, and set off to visit them. I ended up buying a Micromesh set up to
grit 6000, good for polishing a perspex aeroplane canopy to perfection, added additional
sheets in grade 8000 and 12000, a sheet of 3M's International Lapping Film grit 8000, and
one in 12000, plus a quantity of water soluble polishing paste, also for use with perspex,
and thus only very mildly abrasive.
Having paid approximately the price of a 52½ V red ripple Waterman in reasonable
condition, I left again, in a very happy mood. Now only to find some time to do this stuff.
A couple of days later I had the opportunity to try out my newly acquired set, on a pen
that had its nib bent 90 degrees, and straightened again. It needed buffing, as the pen
repair person had to do a job for me in a hurry. I needed the pen the day before yesterday.
Tools used
- plenty of water
- plenty of ink
- plenty of toweling
- different kinds of writing paper
- loupe (30X, diamond loupe)
- small black arkansas stone
- grey Dremel emery polishing wheel
- 1 sheet 1200 grit wetdry sandpaper
- Micro-Mesh set (6 sheets MicroMesh grainsize
1500, 1800, 2400, 3600, 4000 and 6000,
1 bottle of antistatic water soluble polishing fluid,
1 foam rubber polishing block, 1 very fine linen
polishing/cleaning cloth), with additonal sheet
of 8000 and 12000 grainsize.
- 1 sheet 3M Imperial Lapping Film, lightgreen, 1 micron
- 1 sheet 3M Imperial Lapping Film, white, 0.3 micron
- Scanner and simple rig to scan the nib at 2400 dpi
|
So I buffed at the little nick it was showing because some of the gold on the nib had
burrs where it was bent previously. It worked out really wonderfully, no problem. Using
the 12000 Micromesh on the foam buffer pad that came with the set, the burrs were worked
away quite easily. Finishing it to a shine was achieved by using the liquid polish and the
buffing cloth that were provided with the Micromesh set.
Lovely. No damage could be seen anymore at all, and the pen wrote like a dream, smoother
than my Edson, comparing favorably to the Dupont. Ok, I thought, this is it, I just have
to try it. Not today, though, other things to do, and I want to play with this on some
cheap pens as well, before having a go at the Edson.
 |
.... again making circular movements
in a single plane, and rotating
all the way around the tip of the
nib, wetting the tip regularly. |
 |
A week later or so, the converter of the Edson happened to be empty again while I was
sitting at my desk in the basement. Right in the weekend. what an opportunity! It was
 |
 |
| .... checking often with a 30 X loupe. |
.... over to the International Lapping Film, 12000 grit. |
Saturday night late, and I was not going to disturb anyone doing it either. I cleaned it
out, rinsed, splashed, flushed and gargled, got all the tools out, and worked the nib
first with the 12000 Micromesh on the buffing pad. This was done again by making circular
movements in the three dimensions of the nib point, while holding the pen still, using
plenty of water as a lubricant and checking often with a 30 X loupe.
Now over to the International Lapping Film, 12000 grit. A piece was cut, bigh enough
to cover the foam pad and hold it comfortably. The same technique was applied, and now
I noticed that the nib point, the "iridium", started to shine, which it did not do before.
Testing it revealed that there was a slight bit of sharp tooth left on the right hand
side of the nib, so I worked it a bit more, concentrating on that side.
Next try: it was fine now, it felt smooth. A good rinse, flush and cleaning followed
suit. Testing it on 5 different kinds of paper, from cheap, rough stuff to very smooth and
G. Lalo, proved that it was writing absolutely fantastically now, on any paper! Well, at
least the stuff I had around.
 |
Right and left hand side
views of the nib.
Notice the larger rounded surface
on the underside, the
normal writing side of
the nib compared to the
top side of the nib point. |
 |
Time to fill the converter, and do a comparison. Seemed to be as smooth as the Dupont
now, with still some feel to the paper. It was gliding marvelously across the paper,
totally effortlessly.

Ok, what about my M800? That was still a bit rough also, and tended to start with
some difficulty. Studying its nib with the loupe revealed a couple of very sharp edges
to the point, so it got the same treatment. A bit more carefully, though, as it was (is)
an oblique nib. I wanted to maintain its specific character after all. Well, needless
to say, really, but this seemed to succeed as well. It now has still some bite, but it
writes smoothly, rather than catching the paper like it did before, and the shading it
produces is still ok.
As I had this awful Duofold Centennial lying around as well, which used to be messed
up due to dried up Penman ink in combination with a bad nib. The second nib it had now,
was still a rather scratchy one, even having been back to the manufacturer or importer
twice in the last six weeks or so. Ok, why not take a look at that one as well, while
I was busy torturing nibs anyway.
Got it out of of its pen wallet, and tried to scratch some words with it on paper.
This actually made me furious, and I got working on it like a madman for about ten
minutes. Actually, before doing so, I noticed, having a bit more experience, that it
really had a funny sweet spot. You could only write with it well when holding the thing
at an awkward, almost vertical angle!
It was fixed for the most part, as I can write with it now under any angle, almost,
but it is still a bit of a scratching exercise. Maybe I'll just turn it into something
else sometime, but rather not now. Enough for a day's (night's) work...

You may wonder how much time was spent doing all these jobs. Getting all the stuff
out, fixing these pens, and cleaning up took all of about fifty to sixty minutes,
that's all. And I was getting faster at it as well...
 |
 |
|
.... stuck the Lapping Film between
the tines and started to move it
forward and backward, while bending
the film a little, both around and
over the nib ... |
A couple of days into writing with the Edson, the converter was getting empty again,
I noticed that there still was some bite in the nib, especially moving it sideways, to
the left. Of course I did not like that, and got out all the tools again, cleaned the
pen, and looked at the tip aided by the loupe. I noticed the edges of the "iridium" on
the inside, where the slit is, seemed rather sharp, so I stuck the Lapping Film between
the tines and started to move it forward and backward, while bending the film a little,
both around and over the nib, to catch all sides of the slit. Turned the film around,
and did the same with the other tine.
Less than 10 minutes later, I could see the difference with the loupe, and tried to
write with it again. Wow, smooth! No catching anymore. Cleaned everything up, flushed
out the pen once more, and refilled.
This is now my best, smoothest writer, even better than the Dupont. Absolutely no
effort required.
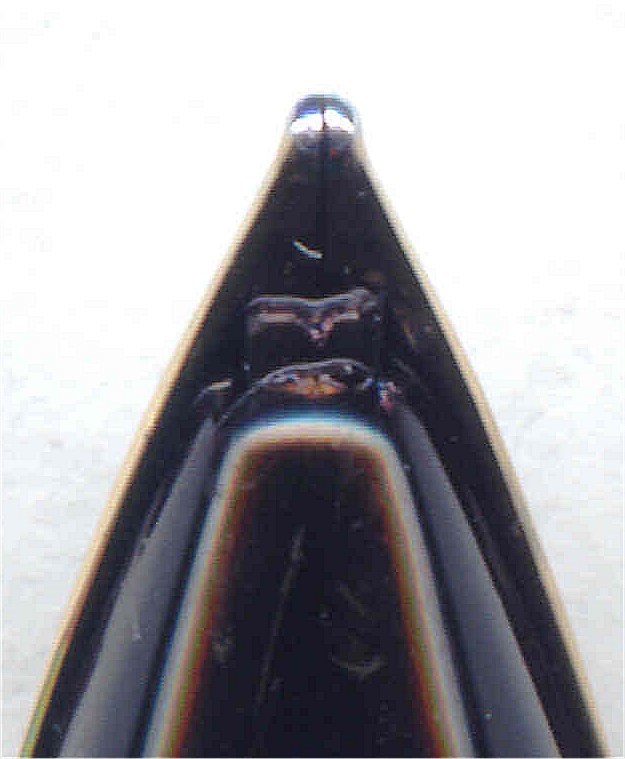 |
Front and back views.
Notice the "baby bottom" look,
be it not extreme.
Back and front of the nib
are rounded, creating a
"ball point", essential for
the dual nib effect
(medium normally, fine turned
around). |
 |
It's two weeks later now, several refills later, and it is absolutely great. Wow!
I love it.
Now, you may ask, would I recommend this practice to others?
Well, if you're not afraid to do this kind of thing, in very little doses with the
right kind of tools, I would exclaim wholeheartedly "Yes, go for it!". However, make
sure you're comfortable with it, and practice on some cheaper pens first. I know, I did
not in the end, but I think I have been lucky...
As long as you take it in small, tiny steps, exert no pressure, check your work
continuously with a loupe and by trying out the pen, you are fixing, on paper, the chances
of doing harm to a pen are minimal.
Use your common sense. If you can't get at least some of the results I described here
in 20 minutes or less, you should send your pen to a nibmeister.
Don't grind away all of the "iridium". You should not really be able to see you've
ground anything away, apart from seeing smoother edges on the tip, unless you're trying
to achieve stubs, obliques or italics starting off from an standard type nib point. But
that might just be something for another installment
.

Oh, on an end note: I've started doing other people's pens as well. After they tried
mine, they realised it was rather a bit smoother than theirs. One of the pens I fixed, was
another Edson. This particular one was perfect in less than 30 minutes, doing all the stuff I
tried out on my own, and is a perfect writer on both sides now
 |
Yes! Holding the section and converter of a pen,
while making a mess with some ink
.
Wim Geeraets is an ICT-consultant,
living and working in the Netherlands, who, after an
abstinence of more than 20 years, re-discovered
fountain pens some five months ago with a vengeance,
and has started tinkering with the pens he acquired
in that period as well.
He may be contacted at fp@kybr.net. |
This contribution was made possible thanks to the
kind photographic assistance by Manuela Thielen and Craig Corbidge,
and the information, encouragement and atmosphere provided by and
through the fountain pen community. Thank you all! |

Next follows some fairly detailed information on micro-abrasives, like mylar (ILF and MFF)
and MicroMesh. A table of gritsizes was conpiled, as well as some general information
on the different types of abrasives. I've put these here, below my grinding notes, so you
may skip it if this goes too far...
| International Lapping Film (ILF) |
| Grainsize, micron |
Abrasive Material |
Colour |
Grit equivalent (approx.) |
Sizes |
Remarks |
| 60.0 |
Al-oxide |
white |
240 |
S1 |
b |
| 40.0 |
Al-oxide |
dark blue |
320/360 |
S1 |
a |
| 30.0 |
Al-oxide |
green |
500 |
S1 |
a |
| 12.0 |
Al-oxide |
yellow |
1200 |
S1 |
a |
| 9.0 |
Al-oxide |
light blue |
2000 |
S1 |
a |
| 5.0 |
Al-oxide |
brown |
3000 |
S1 |
b |
| 3.0 |
Al-oxide |
pink |
4000 |
S1 |
a |
| 1.0 |
Al-oxide |
light green |
8000 |
S1 |
b |
| 0.3 |
Al-oxide |
cream |
12000 |
S1 |
b |
| Micro Finishing Film (MFF) |
| Grainsize, micron |
Abrasive material |
Colour |
Grit equivalent (approx.) |
Sizes |
Remarks |
| 100 |
Si-Carbide |
grey-shade |
120 |
S1 |
b |
| 80 |
Si-Carbide |
grey-shade |
160 |
S1 |
b |
| 60 |
Si-Carbide |
grey-shade |
240 |
S1 |
b |
| 40 |
Si-Carbide |
grey-shade |
320/360 |
S1 |
a |
| 30 |
Si-Carbide |
grey-shade |
500 |
S1 |
a |
| 15 |
Si-Carbide |
grey-shade |
1000 |
S1 |
a |
| 9 |
Si-Carbide |
grey-shade |
2000 |
S1 |
a |
| Micro-abrasives on a non-woven base |
| Grainsize, micron |
Abrasive material |
Colour |
Grit equivalent (approx.) |
Sizes |
Remarks |
| 30.0 |
Si-carbide |
green |
500 |
S1/D |
a |
| 15.0 |
Si-carbide |
grey |
1200 |
S1/D |
a |
| 9.0 |
Al-oxide |
blue |
2000 |
S1/D |
a |
| 3.0 |
Al-oxide |
pink |
4000 |
S1/D |
a |
| 2.0 |
Al-oxide |
nickel |
6000 |
S1 |
b |
| 1.0 |
Al-oxide |
light green |
8000 |
S1 |
b |
| MicroMesh |
| Grainsize, Micro-Mesh |
Abrasive material |
Colour |
Grit equivalent (approx.) |
Sizes |
Remarks |
| 1500 |
? |
black |
750 |
S2 |
b |
| 1800 |
? |
purple |
900 |
S2 |
b |
| 2400 |
? |
red |
1200 |
S2 |
b |
| 3200 |
? |
grey |
1600 |
S2 |
b |
| 3600 |
? |
green |
1800 |
S2 |
b |
| 4000 |
? |
yellow |
2000 |
S2 |
b |
| 6000 | ? |
orange |
3000 |
S2 |
b |
| 8000 |
? |
dark red |
4000 |
S2 |
b |
| 12000 |
? |
dark grey |
6000 |
S2 |
b |
| |
| Sizes: |
| S1 |
Sheets 215 mm x 280 mm |
| S2 |
Sheets 75 mm X 150 mm |
| D |
Self-adhesive disks Ø 127 mm |
| |
| Remarks: |
| a |
Grit size information resource: The
Abrasives Centre Catalog |
| b |
Grit size information resource: Sales
Division, The Abrasives Centre |
| - |
MicroMesh sizes may also be indicated by
a number printed at the back of the sheet |
International Lapping Film and Micro Finishing Film
These two types of micro-abrasives, consisting of micro-abrasive grains laid down
on a completely flat film,
 |
have to be used in conjunction with a fluid for
micro-finishing for steel, synthetic materials, composites. Not to be used for
glass, tungsten or chrome carbides. The polyester base film is supple and
waterproof. It will withstand all customary lubricants, water, solvents, as well
as water/alcohol solutions. |
 |
Used in computers, optic fibres, metallography, analysis, laboratories, microscopy,
optics, electronics, plastics, composites, metals, measuring equipment, moulds,
tools and tooling, petrochemical industry, ceramics.
Imperial Lapping Film (I.L.F.)
 |
An emulsion of carefully for size selected micro-abrasive grains,
poured onto a polyester film. |
The emulsion consists of aligned grains in a resin layer. The backing is a
polyester film.
- Softer than M.F.F.
- Emulsion softer than that of M.F.F.
- Provides a finer finish
- Stays completely flat
- Inert, non-contaminating abrasive film
- Aluminiumoxide micro-grains
Micro Finishing Film (M.F.F.)
 |
Carefully for size selected micro-abrasive grains, of which the sharp
edges are turned outward by an electrostatic process, and fixed into
place by a resin layer on top of a polyester film. |
- More abrasive power than I.L.F., due to the outwardly directed grains
- Fortified backing
- Finish of a very good quality
- Stays completely flat
- Inert, non-contaminating abrasive film
- Siliciumcarbide micro-grains
3M Micro-abrasives on a non-woven base structure
Micro-abrasives on a non-woven base structure may be applied for all synthetics,
steel, stainless
 |
steel, non-ferro metals, polyester, plexiglass, resin, lacquer,
varnish, glass, enamel, lead crystal glass, mother of pearl,ivory, precious
kinds of wood, polishing of watch dials, removal of stamp imprints, removal
of irregularities, glazing, polishing for analyses, roughening surfaces. |
 |
- Used for polishing with water, oil, petrol, turpentine, alcohol
- Liquid absorbing structure, difficult to tear, very supple, easily cut to size or shape
- Polishing of any material
- Efficiency of the grains
 |
Polishing and micro-polishing is always done with water or other fluids.
Soap solutions are best sprayed onto the surfaces to be worked upon. Take
care to insure that abarasive material and objects stay sufficiently
wet. High gloss polishing requires abundant wetting and copious use
of polishing liquids.
|  |
To be used for extremely fine grinding, dry, with water, or fluids based on
alcohol, petrol, oil, paraffin, turpentine. Non-destructive removal of traces
of corrosion. Laboratories, tools, optics, weapon industry, varnish, lacquer,
synthetic materials, workpieces and finishings of high quality.
MicroMesh: Micro-abrasive grains on a supple weave.
Micro-abrasive grains are indispensable in modern industry. Technological
products like the heads in hard disks, vital airplane parts, chips, etc.
are unthinkable without these abrasives.
 |
Micro-Mesh may be used in many different production methods.
Micro-Meshsheets are made of a fabric or weave of extremely
supple and incredibly strong fibres, covered with calibrated
micro-grains. This is done in dust free, surgical type
"white rooms", with the utmost care, as a single 6000 grain
strayed into the 8000 grain production
|  |
process may havecatastrophic consequences, e.g. a malfunction of a flightcomputer
aboard an airplane on a transatlantic flight at 30000 feet.
There is a complete Micro-Mesh assortment for all kinds of different uses and
unlimited possibilities, like
 |
polishing of acrylates, optical glass and optical instruments,
high-precision tools, airplane windows and cockpits, delicate mechanisms,
etc. It may be used to remove scratches or "rainbows" or angel hair from
airplane cockpits, scratches from luxury weapons (both from steel and wood),
antiquities, paintings, objets d'art, e.g. ivory statues, inlays, jewels,
chinese lacquer, furniture, etc.
|  |
There is also a set, consisting of six sheets of different grainsize in a
75 x 150 mm format, as a bottle of antistatic polishing fluid:
- 6 x 1 sheet from grain 1500 to 6000
- 1 bottle of antistatic polishing liquid
- small (foam) buffing block
- polishing cloth
© 2004 Wim L.M. Geeraets
aka the Mad Dutchman
*** ***** ***
|